The Hapi book support pages 1 through 10
Page 1. Two Finger Black Key Song: Play to Learn Demonstrate/imitate
First Lesson: DEMONSTRATE: Play an easy black key song right away!! Watch the video demonstration below.
IMITATE: Position your Left hand third finger over the lower black key of a three black key group (F#). It should stay and play that key (F#) repeatedly.
Position your Right hand third finger over the upper black key of the same three black key group (A#). Watch the video to capture the movements of that finger. IMITATE what you see and hear.
Position your Right hand third finger over the upper black key of the same three black key group (A#). Watch the video to capture the movements of that finger. IMITATE what you see and hear.
----------------------------------------------------------------------------------------------------------------------------------------------
1 Two Finger Black Key Song
Type: Demonstrate/Imitate
Purpose: To play a song RIGHT NOW. Immediate satisfaction!
How: Watch the video, putting 3rd fingers on the black keys as shown, listen, watch, and imitate. Repeat until it is easy.
Useful Variations: You don’t have to use the third fingers. Any fingers will do, in fact either hand could play the whole song by itself.
Gains: A feel for the keyboard, how it sounds, how it is organized, higher tones to the right, lower tones to the left. Black keys form a natural pentatonic (five tone) scale that match the lower harmonics of all musically vibrating bodies (strings, bells, air inside instruments, vocal chords, drum heads, etc.)
More gains: After mastering the song, stop watching your hands and let them find the keys by touch.
Even more gains: After mastering the song watch the music notation on the page, note heads with stems up are for the right hand, stems down are for the left hand. Even though you may not know any key letter names you can still see the visual pattern of what you are playing in front of you. Start to SEE why we say “Music Looks Like it Sounds”.
BTW: Many beginner books start with only white keys leaving the blacks to be feared as advanced playing. Not here, it is the black keys that tell us where we are, that orient our eyes and hands. Black Keys begin as 'friends'.
2 Wag the Thumb Play to learn
Reading simple music
Play the video. Position your right thumb on Middle C, the white key just to the left of the two-black-key group nearest the middle of the piano (below the 'Name'). Letting the wrist rise with the thumb, lift and play the C. Looking at the music you will notice the note positioned so it's stem lays on the upper staff (five lines four spaces): The upper staff is meant for the right hand. There are four C's to play in the first measure (area between the vertical bar lines) and four more in the second measure. Then the second finger gets to play D's, notice the note head position went up a step on the staff? That step means the very next white key to the right, or the D key. (If confused watch the video again.) The next note drops back down to Middle C, then up to D . . . you get the idea. Observe, think and imitate.
In measure 5 the note stems are connected with a 'bar' at the top. That's a rhythm indication, in this case meaning to play exactly twice as fast. Music looks like it sounds. Listen to the video while you watch the notes. This is 'primitive', but it is correct.
Measure 7 switches to the left hand. That is indicated by the notes and their stems written on the lower staff. Again watch the video, the left thumb plays Middle C this time, and the note heads move DOWN indicating the left hand second finger will play the white B key to the left of Middle C. Now watch the notes on the page and READ MUSIC ! !
Don't forget to play the barred stemmed notes twice as fast. (Listen to the video while you watch the notes.)
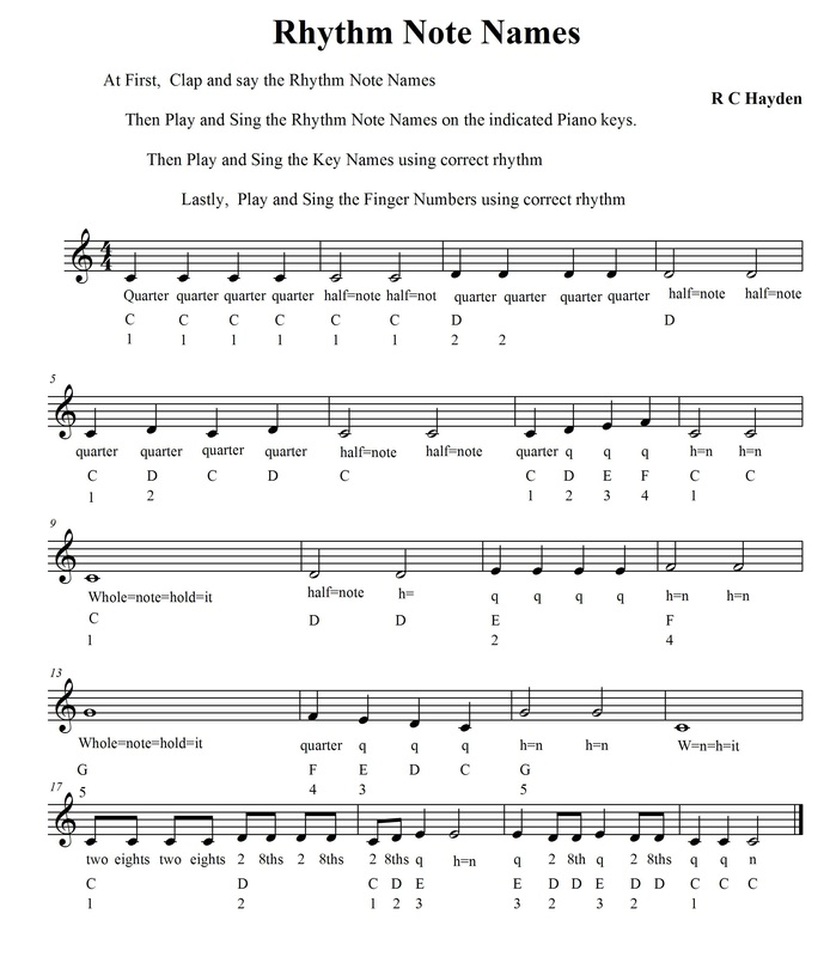
3 Rhythm note names
"Say and Play" to learn Rhythm: Speaking rhythm note names
Below is what we call the "Grand Staff". We are going to name the notes and clap the upper staff only. The names are under the notes, but as you move down the page the names become abbreviated. Identify the notes from their names.
Say the names rhythmically (listen to the video). You will learn (1) what they are called and (2) their rhythmic value in musical time. What you are experiencing is relationship of the rhythmic notes to each other. Listen to the video and learn . . .
Say the names rhythmically (listen to the video). You will learn (1) what they are called and (2) their rhythmic value in musical time. What you are experiencing is relationship of the rhythmic notes to each other. Listen to the video and learn . . .
4 little bitty mouse
|
|
6 Find all the abc's |
7 The Tortoise and the Hare |
8 THE INTERVAL SONG PLAY TO LEARN
SHORT CUT: IDENTIFYING INTERVALS AND PATTERNS IS ONE WAY THAT PEOPLE READ MUSIC RAPIDLY. THEY ARE NOT SEEING EACH NOTE AS AN ALPHABET LETTER, INSTEAD, THEY ARE SEEING NOTES ON LINES AND SPACES, THAT OWN KEYS, THEN THROUGH INTERVALS AND PATTERNS INSTANTLY SHAPING THEIR HAND TO PLAY THE PATTERN. MUSIC NOTATION IS A VERY VISIBLE, SENSIBLE, DISCERNABLE HYROGLYPHIC LANGUAGE.
SHORT CUT: IDENTIFYING INTERVALS AND PATTERNS IS ONE WAY THAT PEOPLE READ MUSIC RAPIDLY. THEY ARE NOT SEEING EACH NOTE AS AN ALPHABET LETTER, INSTEAD, THEY ARE SEEING NOTES ON LINES AND SPACES, THAT OWN KEYS, THEN THROUGH INTERVALS AND PATTERNS INSTANTLY SHAPING THEIR HAND TO PLAY THE PATTERN. MUSIC NOTATION IS A VERY VISIBLE, SENSIBLE, DISCERNABLE HYROGLYPHIC LANGUAGE.
|
p 9 Amazing Grace Played on the black keys alone.
|